Your cart is currently empty!
Category: Side Dish
-
Crostini with Flaxseed Spread
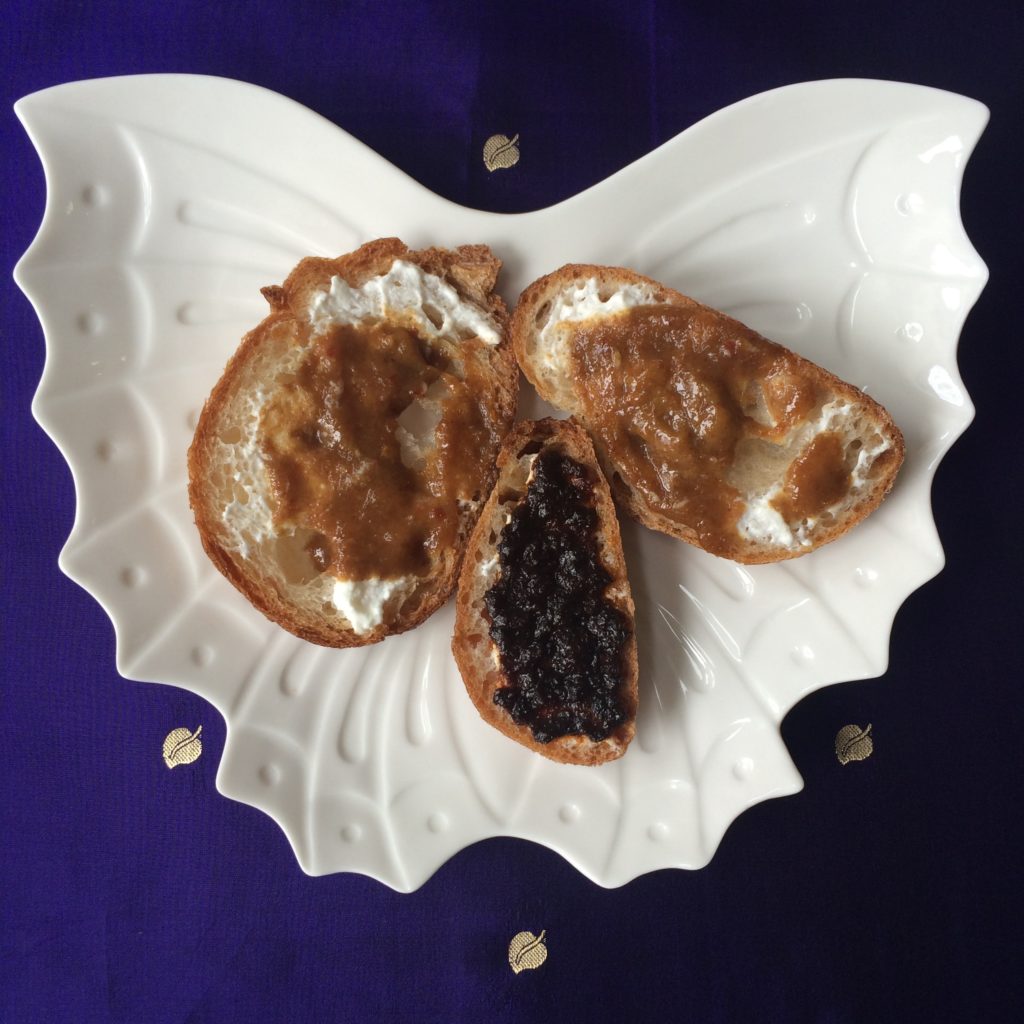
- 1 baguette, sliced 1/4-inch thick
- ½ cup olive oil, optional
- ¼ cup any of our Flaxseed Spreads
- 4 oz goat cheese
Place sliced baguette on baking sheet and brush with the olive oil if desired. Place pan in preheated 325° F oven and bake until golden brown for about 7 minutes. Remove and top with any of our Flaxseed Spreads and the cheese.
Serves 6 to 8, as an appetizer.
-
Baby Potatoes with Savory Flaxseed Spread
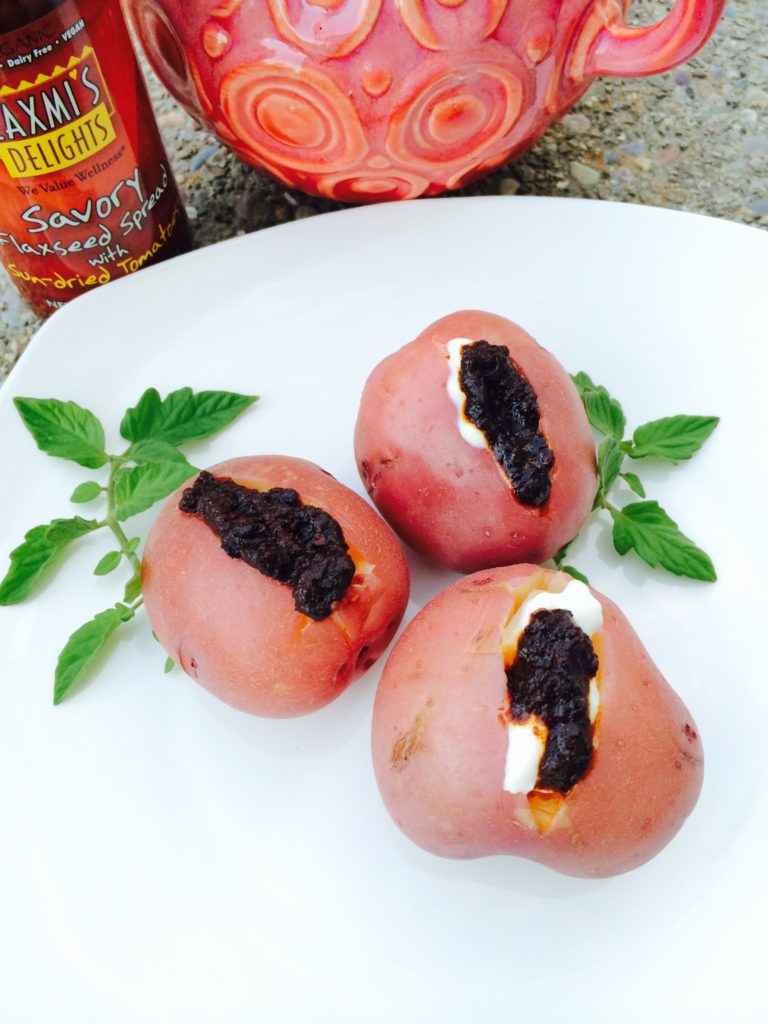
- 1 pound (small 6 to 8) Yukon gold, purple, Russet or new potatoes
- 2 tablespoons Savory Flaxseed Spread with Sun-dried Tomatoes
- Chopped fresh cilantro
Scrub the potatoes and place them in a large pot. Boil until just tender, 15 minutes. Let cool until easy to handle. Place them whole on a warm serving dish. Make a slit at the top. Drizzle with a generous tablespoon of the Savory Flaxseed Spread and serve warm.
Alternately, dice potatoes into 1-inch pieces. Mix gently with the Flaxseed Spread. Transfer into a decorative serving dish. Garnish with cilantro and serve. Serves 4 to 6 as a side dish.
Variation: Garnish cooked shrimp, shellfish, salmon, oysters and roasted vegetables with couple tablespoons of Savory Flaxseed Spread with Sun-dried Tomatoes or the Lemony Flaxseed Spread with Ginger and Honey
-
Lemon Rice with Cranberries
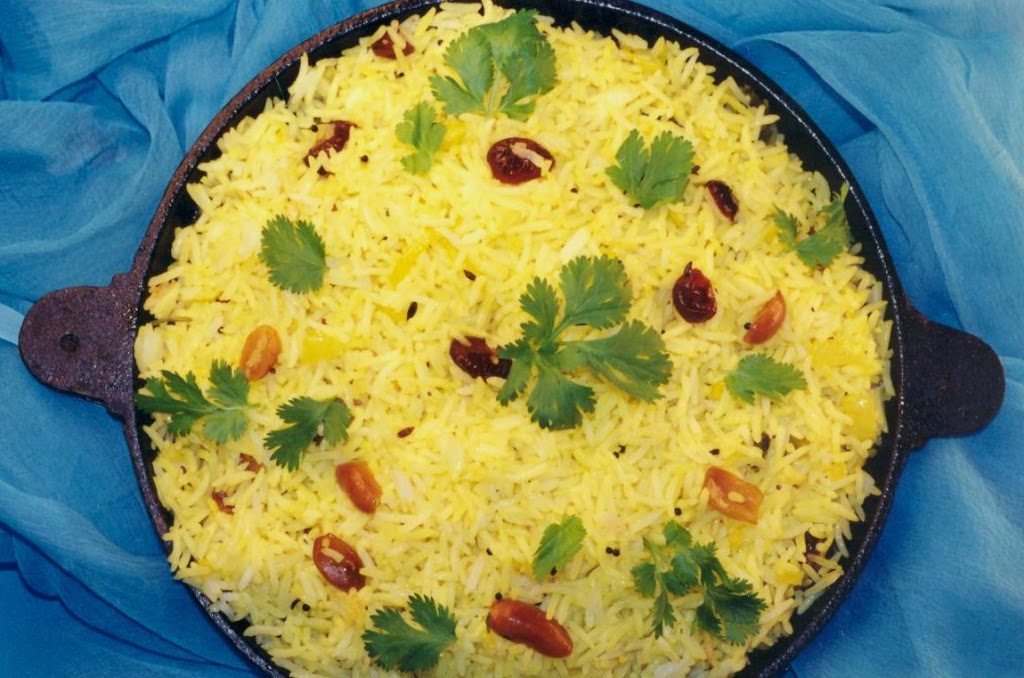
This is a simple and yet visually stunning dish. My mother would collect leftover rice and embellish it with this lovely zesty seasoning and lots of fresh lime juice. No one ever minded that it was ‘recycled’ rice. If you don’t have leftover cooked rice, it is worth making fresh rice to enjoy this pilaf, that’s how I make mine for special meals.
- 5 cups day-old cooked basmati or jasmine rice
- 1 teaspoon salt
- 1 teaspoon sugar
- ¼ cup or more freshly squeezed lemon or lime juice
- ¼ cup chopped fresh cilantro plus additional sprigs for garnish
- 3½ tablespoons vegetable oil
- 1 teaspoon mustard seeds
- 1 teaspoon cumin seeds
- ¼ cup roasted salted or unsalted peanuts
- 2 tablespoons dried cranberries
- 1 cup finely chopped onion
- 2 fresh hot green Serrano or jalapeno chilies, stemmed and chopped
- ¼ teaspoon turmeric
Place the rice in a large bowl. Sprinkle salt, sugar, lime juice and cilantro. Toss gently to mix. Set aside.
Heat the oil in a large heavy sauté pan or Dutch oven over moderately high heat. Add the mustard and cumin seeds; immediately cover with a spatter screen, and cook until the seeds stop popping, about 30 seconds. Add the nuts and cranberries and stir about 1 minute. Add the onion, chilies and turmeric. Cook, stirring occasionally, until the onion is soft, for 3 minutes. Reduce the heat to low. Add the rice and mix thoroughly until each grain is stained yellow from the turmeric. Cover and cook until very hot, 6 to 8 minutes. Transfer to a heated serving platter. Arrange sprigs of cilantro and serve hot or warm or at room temperature.
Serves 5 as a main dish, 8 as a side dish.
-
Skillet Egg Masala (Kadai Ande)
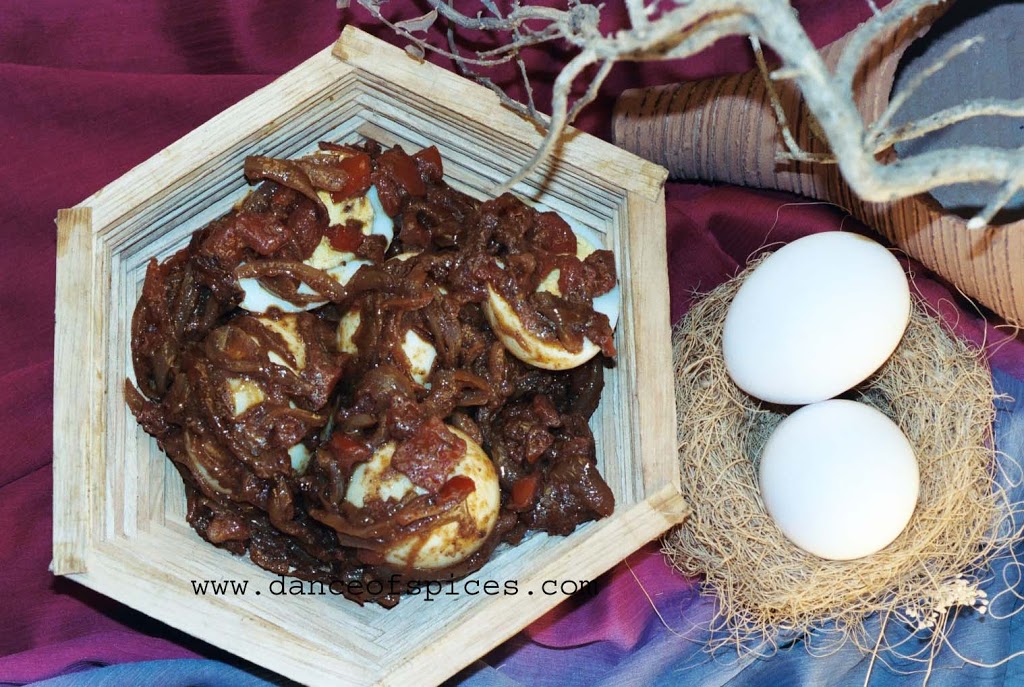
Finally I am getting back to writing my blog. Time just flies by with product launches, travel, and the big one— my son’s wedding planning.
Here is my recipe for spiced skillet hard-boiled eggs. Every region in India has its own egg curry, the sauce ranges from soupy chowder consistency to almost dry like the following recipe I’ve chosen. Egg curry is very traditional and is considered an important part of Indian cuisine and is especially popular with children.
A different experience than usual deviled eggs a more flavorful tasty treat with a wealth of spices, yet mild. Use this egg masala on steamed or roasted vegetables or any firm white fish steaks.
- 4 large eggs
- Seeds from 2 green cardamom pods
- 3 whole cloves
- ½ inch stick cinnamon
- 1½ teaspoons coriander seeds
- ½ teaspoon scant fennel seeds
- ½ teaspoon black peppercorns
- ½ teaspoon cayenne
- 2 tablespoons vegetable or canola oil
- 1 cup thinly sliced onion
- ½ cup finely chopped tomato
- ½ teaspoon salt
- ¼ cup water
Place eggs in a single layer in a saucepan. Add enough cold water to come 1-inch above the eggs. Bring to boiling over high heat. Reduce the heat so the water is simmering. Cover and cook 15 minutes; drain. Place eggs in cold water until cool enough to handle. Drain. Gently tap each egg on the countertop. Peel off the eggshell, starting at the large end. Cut the eggs in half lengthwise.
While the eggs are cooking combine the cardamom, cinnamon, cloves, coriander, fennel, peppercorns, and cayenne into a spice grinder and grind to a fine powder. Set aside.
Heat the oil in a heavy medium sauté pan or skillet over moderate heat. Add the onion and fry, stirring often, until deep golden, 8 to 10 minutes. Add the ground spice powder and stir until fragrant. Add the tomato and cook until tomato is very soft, 6 minutes, stirring occasionally. Add the salt and water (you may add the halved eggs in here for the eggs to absorb more curry flavor); cook the sauce for 2 more minutes and remove from the heat. Or you can place the eggs neatly on a warm serving platter and top each half with the curried sauce. Serve right away.
Serves 4 as a side dish.
-
Multicolored Whole Wheat Puffy Bread for Mother’s Day
During leisurely weekends I find myself tempted to making puffy breads, they partner well with Mixed Sprouts Stew I often make for brunch. When you entertain, I encourage you to try the variations as well, a multicolored platter of spinach, tomato, yellow bell pepper and/or beet puri surely will be an attractive centerpiece. Puffy bread is called puri in India.
I’ve added sugar here, it helps to retain the puris stay puffed longer, you may omit it if you like. A special technique of adding hot oil to the flour is characteristic of southwestern region of India. Next time you make puris sprinkle about a teaspoon of cumin seeds for a novel appeal. Serve as snack or for a special Mother’s Day meal.
- 2 tablespoons oil plus additional for frying
- 2 cups Indian chapati flour (or 1 cup whole wheat flour and 1 cup unbleached all-purpose flour)
- ½ teaspoon sugar
- ½ teaspoon salt
- ¾ cup water
- Whole wheat or unbleached all-purpose flour for dusting
1. Heat 2 tablespoons oil in a large (9 to 10-inch) wok or skillet until hot but not smoking.
2. Combine the flour (or flours), sugar and salt in the work bowl, and pulse to mix. Add the hot oil. Pulse until crumbly. With the machine running, gradually add the water through the feed tube in a steady stream. Process until the dough comes together into a ball and begins to clean the sides of the bowl. Avoid over processing.
3. Place dough on a work surface; lightly coat both your hands with oil and knead well for 6 to 8 minutes, the dough should be medium-soft and hold an impression of your fingertips when pressed. Form into a smooth ball, cover loosely with kitchen towel or plastic wrap and let rest for 30 minutes to an hour.
4. Place the dough on a floured work surface and knead briefly. Divide into 3 portions. Roll each portion into a long rope between your hands; using a dough cutter cut each rope into 6 portions, about the size of walnuts. Form each portion into a smooth ball, put on a plate and cover with a kitchen towel to prevent drying. Fill the same wok or skillet with oil to a depth of 1½ inches and heat over medium-high heat until very hot. Place a ball of dough on floured work surface and roll it out to about 2½ to 3 inch circle and about 1/8 inch thick, dusting with flour as necessary. You can roll 4 to 6 puris ahead and place in single layer on a platter (do not stack), cover with plastic wrap.
5. Carefully slide 1 to 2 rounds into the hot oil. As puris rise to the top, use a spoon to lightly bathe them with oil so that they will begin to puff. (At this point you can roll out another ball of dough to have ready when this puri is fried.) After 20 to 30 seconds, flip puris and fry until lightly golden for 15 to 20 seconds. Use a slotted spoon to transfer the puris to a tray lined with paper towels. Repeat with the other rounds, and the remaining portions of dough.
6. Transfer the finished puris to a cloth-lined basket and serve. Or place on a cookie sheet, tent with foil and keep warm in a 250 degrees oven for up to 30 minutes.
Makes 18, Serves 3 to 4
Variations – Multicolored – Puffy Bread (Puri)
Spinach Puri
Cook 2 cups chopped spinach until wilted; add to the flour. Add 1/3 cup water first while kneading, add more if necessary according to the feel of the dough. After resting divide dough into 2 portions. Roll each portion into a large rectangle to 1/8-inch thick. Using 3½ biscuit cutter, cut out 5 to 6 rounds. Fry each round. Repeat with the other portion of dough. Reknead and reroll the trimmings and cut out and fry a few more rounds. You may do the same with the plain puri.
Tomato and/or Beet Puri
Cut off all but 1-inch of stems and roots of 1 medium red beet. Rinse, but do not peel. Cook covered in boiling salted water for 45 to 50 minutes or till tender. When cool enough to handle slip skins off the beet. Dice the beet and 1 small tomato into quarters and add to a food processor. Add ½ teaspoon sweet or hot paprika and process into a puree, scraping the sides of the bowl, if necessary; then add other ingredients gradually (do not add water) and process into smooth dough. If the dough is soft add more flour to get the right consistency.
Golden Yellow Beet and/or Yellow Bell Peppers Puri
Cut off all but 1-inch of stems and roots of 1 medium yellow beet. Rinse, but do not peel. Cook covered in boiling salted water for 45 to 50 minutes or till tender. When cool enough to handle slip skins off the beet. Dice the beet and 1 yellow bell pepper into quarters and process into a puree, scraping the sides of the bowl, if necessary; then add other ingredients gradually (do not add water) and process into smooth dough. If the dough is soft add more flour to get the right consistency.
-
Cream Of Wheat Pilaf With Carrots and Nuts
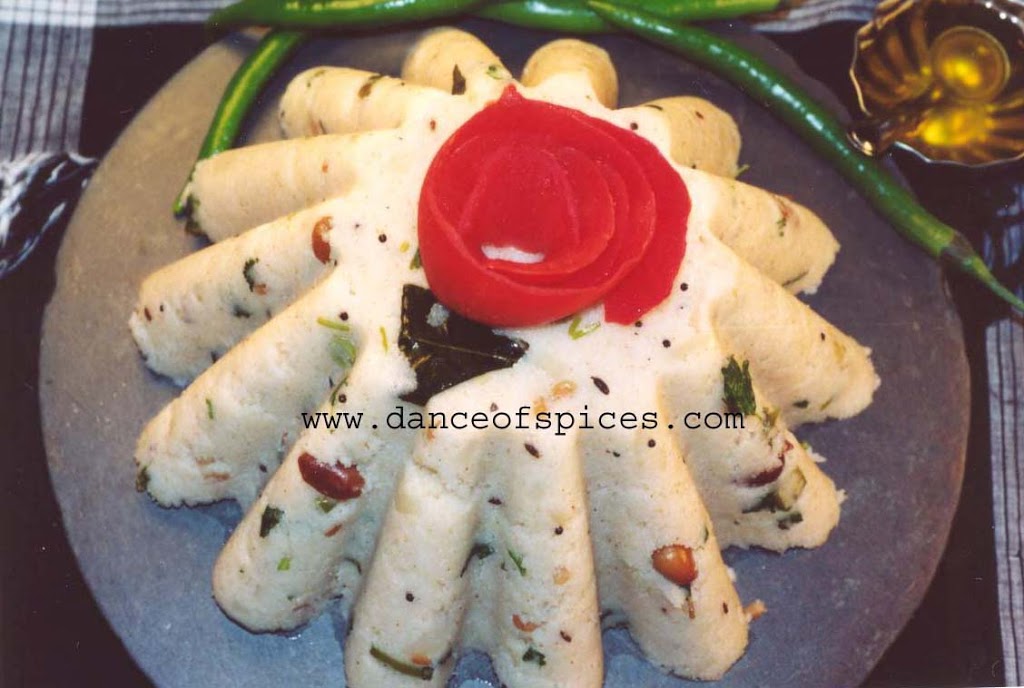
Uppuma, (pronounced oop-mah) is served for breakfast in India. If you want to get away from the usual breakfast or you’d like a change of pace, try the following fluffy nutritious cream of wheat pilaf. The long list of ingredients should not discourage you; they are simply added one after another to perk up the relatively bland taste of cream of wheat. Low in calories, it is made extra nutritious by adding nuts and vegetables.
For an authentic taste use sooji, Indian cream of wheat from local Indian stores. The dal and kari leaves are available at Indian groceries, if you cannot find don’t worry about it.
Serve this light balanced meal for weekend breakfast or brunch when you have the time along with a mango-banana smoothie.
- 2 tablespoons vegetable or peanut oil
- 1 teaspoon white split gram beans (urad dal) (optional)
- ¼ teaspoon mustard seeds
- ¼ teaspoon cumin seeds
- 2 tablespoons roasted salted or unsalted peanuts or cashews
- 10 kari leaves (optional)
- ½ cup chopped onion
- 1 fresh green serrano or jalapeno chile, stemmed and chopped
- ¼ cup carrot cut into ½ -inch sticks
- ¼ cup green beans cut diagonally into ½-inch pieces
- 1 cup Indian semolina (sooji coarse) or cream of wheat
- 2¼ cups water
- 1 teaspoon salt
- 1 teaspoon sugar
- Juice of ½ lime
- Fresh chopped cilantro
1. Heat the oil in a heavy large skillet or sauté pan over moderately high heat. Add the dal, mustard and cumin seeds; immediately cover with a spatter screen, and cook until the seeds stop popping, about 30 seconds. Add the peanuts and kari leaves and stir 1 to 2 minutes. Add the onion, chiles, carrot and green beans. Cook stirring occasionally until the onion is soft but not brown, 3 minutes. Add the semolina and lower the heat to moderate. Cook stirring frequently until toasty smelling 5 to 6 minutes; if you’re using the Indian sooji be sure to stir-fry at least 10 to 12 minutes, until toasty and you begin to smell the nutty flavor taking care not to brown. Transfer to a bowl and set aside.
2. Add the water to the same skillet and bring to a boil. Add the salt and sugar. Lower the heat to moderate and gradually stir in the farina. (Water is critical here, the rule of thumb is twice the amount of grain, but I prefer a tad more, which helps the grains to soak and plump.) Mix a few tablespoons at a time, stirring constantly in one motion until all the water is absorbed, be careful while stirring because the mixture starts to spatter; reduce the heat to low at this time. Sprinkle the lime juice and mix gently. Add the desi ghee, cover and cook at least 5 minutes (do not peek) until the grains are fluffy and plump and meld with all the flavors. Let the uppuma rest, covered for 5 minutes.
3. Turn on the oven to your lowest setting and warm some plates in it. Just before serving, spoon the uppuma into individual custard cups or decorative mold. For an attractive arrangement, place a warmed serving plate upside down on top of the decorative mold. Invert the mold over the plate holding both securely, and let the uppuma slide down onto the serving plate. Top each serving with tomato roses if you prefer and serve hot, sprinkled with fresh cilantro. I like this uppuma best when it is warm, as it cools it looses its fluffy texture.
Serves 4.
-
My Mother’s Heirloom Whole Pickled Limes
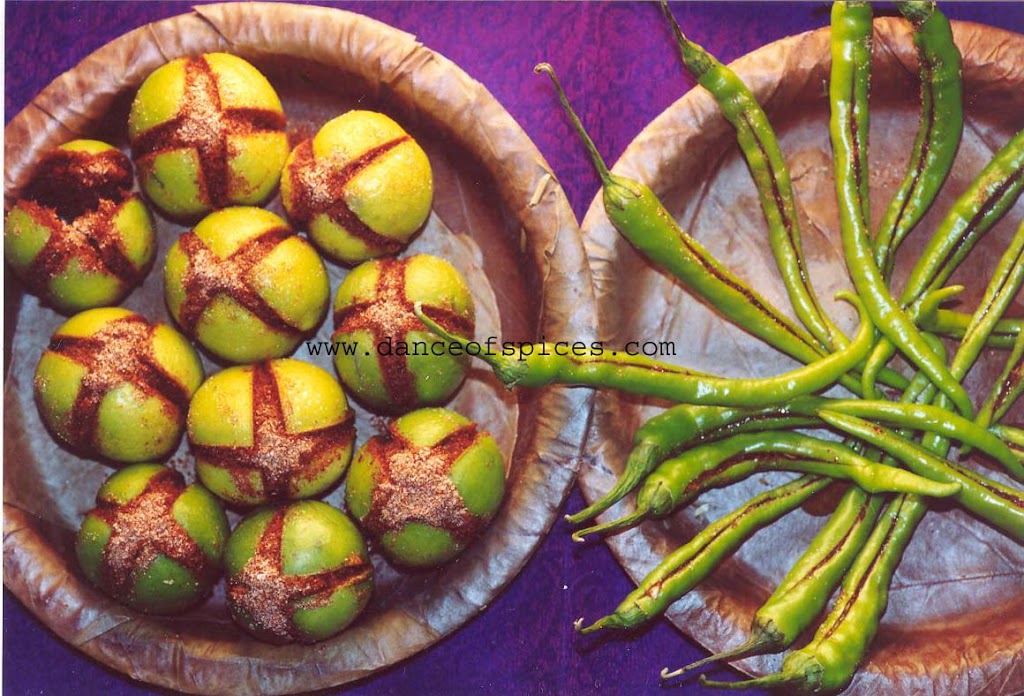
I am hosting a get together this weekend. I like to pay attention to every detail. I think, it’s really the small things that make a big difference. Take pickles, for instance, they can enhance and glorify a meal. At my local farmers market I came across an abundant of luscious, plump limes. Walla! All I could think of was my mother’s whole lime pickles. My mouth started watering looking at the plump bright green limes.
If you think pickles are something only your grandmother would make and that they’re hard to prepare, then this recipe (I’m sure even my grandmothers would’ve agreed) will prove otherwise. Pickle is the soul of the Indian kitchen and, when it’s lovingly handmade, and passed from generation to generation like family heirlooms it is a perfect gift to the culinary world.
This oil-free, easy and straightforward preparation is my mother’s 50-year-old recipe I’d like to share that with you. She makes it every year in summer for family, friends and neighbors. Preparation of pickles used to be an elaborate process involving a lot of attention. I can recollect mother plucked 500 plump juicy limes, right from her organic garden and carefully screened each one. Then they were meticulously rinsed and wiped with linen. Earthenware crocks of approximately 5-gallon capacity were cleaned and sun-dried. Plump, fragrant spices were hand picked and dried in sun. The choice of chile powder (cayenne) was very important. It was always freshly pounded and mother went a step further with her innovative mind, she mixed three to four different varieties of dried chiles to achieve a deep ruby-red color so the finished pickle attained a beautiful hue. The pickling process was carried out only on a bright sunny day to avoid moisture from the atmosphere. The care and love that went into the preparation was worth the time and effort. Mother made beautiful little baskets with bowls of fresh homemade pickles to all our friends, relatives and neighbors. Although I make these here in late summer when limes are large and juicy, each time I visit India I still get enormous refills of my mother’s handmade pickles.
These are lovely with vegetarian as well as fish and meat dishes.
- 2 pounds (10 large) limes
- 1 teaspoon fenugreek seeds
- 1 teaspoon cumin seeds
- ½ tablespoon mustard seeds
- ¼ teaspoon turmeric
- ¼ cup sugar
- 1/8 cup cayenne
- ¼ cup salt
1. Wash the limes and wipe dry with a kitchen towel. Slit each lime crosswise into fourths leaving ½-inch uncut at one end (similar to the ‘X’ you make while blanching the tomato, this should be a deeper ‘X’). Place in a large mixing bowl. You don’t have to remove the seeds leave them in for a rustic appeal.
2. Combine the fenugreek, cumin and mustard seeds in a small dry frying pan. Toast over moderate heat until aromatic and mustard seeds start to pop, shaking the pan frequently, about 5 minutes. Cool and transfer to a spice grinder or coffee mill and grind to a fine powder. Dump into a small bowl. Add the turmeric into the same frying pan and warm it on low heat for 1 minute. Add to the bowl. Stir in the sugar, cayenne and salt. Mix thoroughly. Gently spread the cuts open of each lime and sprinkle the spice mix between the slits. Place limes into a crock. Cover with lid and store in a cool dry place. Let the pickle cure for 3 to 4 days before serving. Occasionally give a shake, so the bottom pickles come at the top and the top ones move to the bottom. Shake the crock a couple times for about 4 to 5 days. Refrigerate after a week. (To be on the safe side I recommend refrigeration).
Makes about 3 cups
Variation – Chile-Lime Pickles
If you prefer, using gloves, slit 10 to 15 long slender fresh hot green chiles do not stem, (be sure to use the gloves), sprinkle some of the pickling spice mix into the slits and toss into the crock.
-
Fresh Mixed Veggie-Yogurt Spread at Sprouts Cooking Club
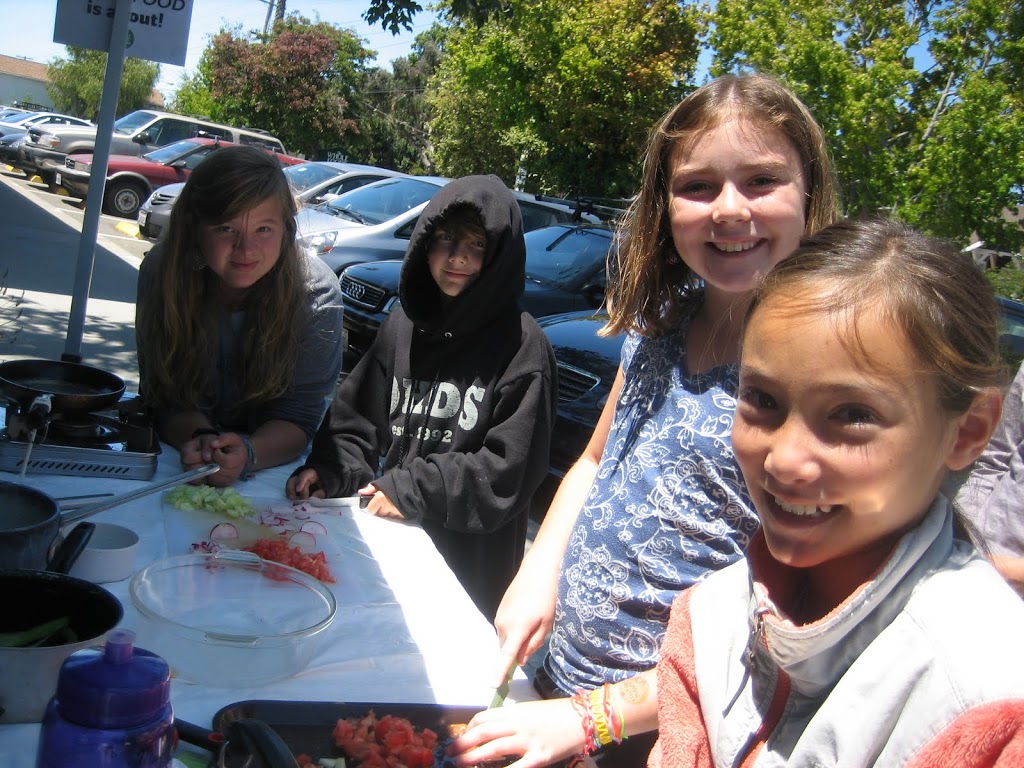
Last week, I had the pleasure to teach children at the Sprouts Cooking Club in Berkeley. I believe they were between the ages of 5 to 14 years. The class was full with 18 children. Several adult volunteers supervised the kids. The class was held at the Whole Foods parking lot under a cozy tent. The Whole Foods Market supplied the ingredients for the class.
I was so impressed by the young children’s enthusiasm and participation. They were well organized with their cutting board, mixing bowl, small pots and knife. They cut the vegetables with great interest (of course, under adult supervision), so finely and in uniform pieces they would put us professionals to shame. I was told some of them were very good at mincing, dicing, and cubing. Best of all, they were proficient at rolling leafy green or herbs and chopping into delicate strips referred to as chiffonade. As they assembled the following mixed vegetable spread, we passed along slices of crusty bread. The little kids were even happy to enjoy it as a cool crunchy salad in small cups by itself. It was nice to see the youngsters enjoying wholesome mother earth’s bounty.
Use this light and easy mixed vegetable concoction as a dip or spread on crusty bread to make vegetarian sandwiches. You can also serve as a side dish salad for lunch.
- 2 large tomatoes
- 2 medium cucumbers, such as English, pickling (about 10) or regular
- 1 bunch red radishes
- 1 small white, red or yellow onion
- ¼ cup chopped cilantro
- 4 cups plain yogurt
- 2 teaspoons or to taste salt
- 1 tablespoon sugar
Core the tomatoes, chop finely and transfer to a large bowl. Peel and seed the cucumber; chop in half inch pieces and transfer to the bowl. Finely slice the radishes then stack and julienne the slices; transfer to the bowl. Peel and quarter the onion and slice thinly lengthwise; add to the bowl. Sprinkle with the cilantro.
Just before serving, in a bowl, combine the yogurt, salt and sugar. Beat with a fork until smooth. Fold into the prepared vegetables.
Serves 6 to 8 as an accompaniment or use as a vegetarian sandwich spread.
-
Red And Golden Beets Kachumber With Orange
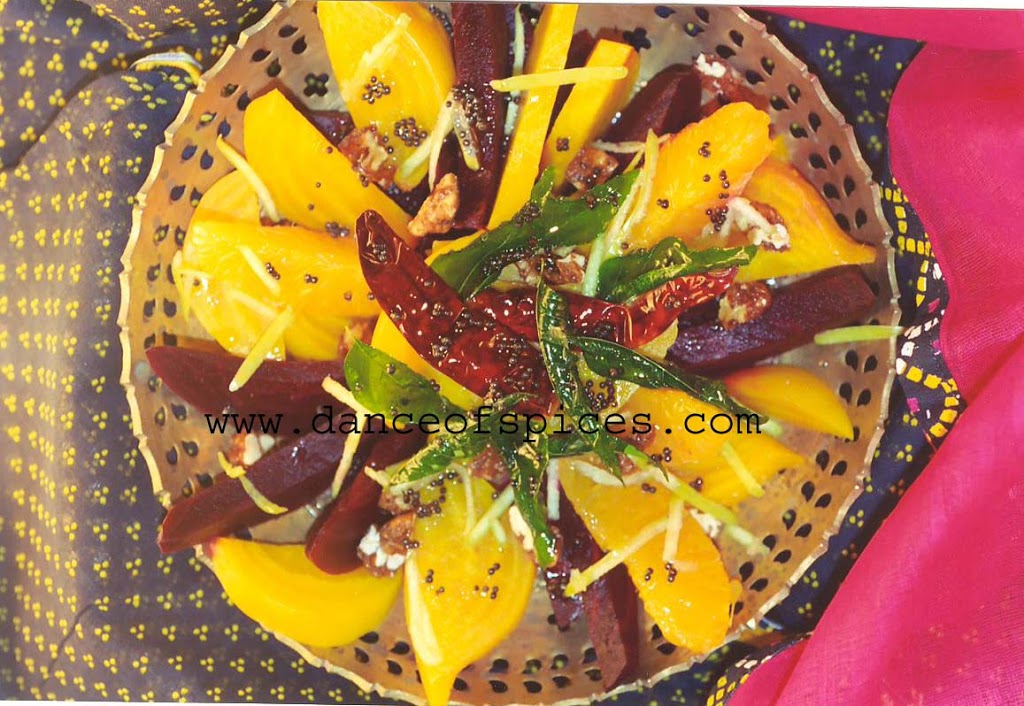
It has been so long I created a new post. I was traveling; also, someone hacked into my gmail account. You see the ‘followers’ down below someone added my name and photo. Anyone knows how to delete it? Thanks in advance for your help.
The following is an Indian style salad, called kachumber. This type of fresh salad relies on chopped, crisp vegetables moistened with oil-based dressing rather than yogurt flavored with spices. It can be made from raw or cooked fruits and vegetables, standing alone or in combination.
Kachumber is not nearly as well known outside of India. In texture, kachumber resembles coleslaw, but contains no mayonnaise. A light coating of spice-infused oil seasoning takes the place of vinaigrette. It is added to give shine, smoothness and flavor. Most kachumbers use one or two grated or shredded vegetables, either raw or cooked, with a flavorful boost from the zesty spice-infused oil, a touch of fresh herbs and a sprinkle of lime juice. Whether the salad uses vegetables that are raw or blanched, sliced or shredded, they are meant to be refreshing contrasts to the accompanying dishes.
This recipe is a variation on a salad I tasted several years ago at the Culinary Institute of America, in St. Helena. Golden and red beets make all the more interesting combination added by the subtleties of tangy green mango.
- 1 large red beet
- 2 medium yellow beets
- 1 small orange, separated into sections and white parts removed
- 1 small green mango, peeled and grated
- ¼ cup fresh lime juice
- ¼ cup coarsely chopped toasted walnuts
- 2 tablespoons canola oil
- 1 teaspoon mustard seeds
- 2 tablespoons chopped cilantro or kari leaves
To prepare the beets, cut off all but 1-inch of stems and roots. Rinse; do not peel. Cook covered, in boiling salted water till crisp tender for 40 to 50 minutes. When cool enough to handle slip skins off the beets.
Dice beets into 1/8-inch wedges. Transfer to a decorative serving bowl. Add the orange and mango. Drizzle the lime juice. Top with nuts.
Heat the oil in a small skillet over moderately high heat. Add the mustard seeds; immediately cover with a spatter screen, and cook until the seeds stop popping, about 30 seconds. Toss in the cilantro. Cook few seconds until crisp. Cool slightly and pour over the kachumber, scraping the pan with a rubber spatula. Serve right away.
Serves 4 as a complimentary dish.
-
Those Magnificent Marvelous Green Mangoes
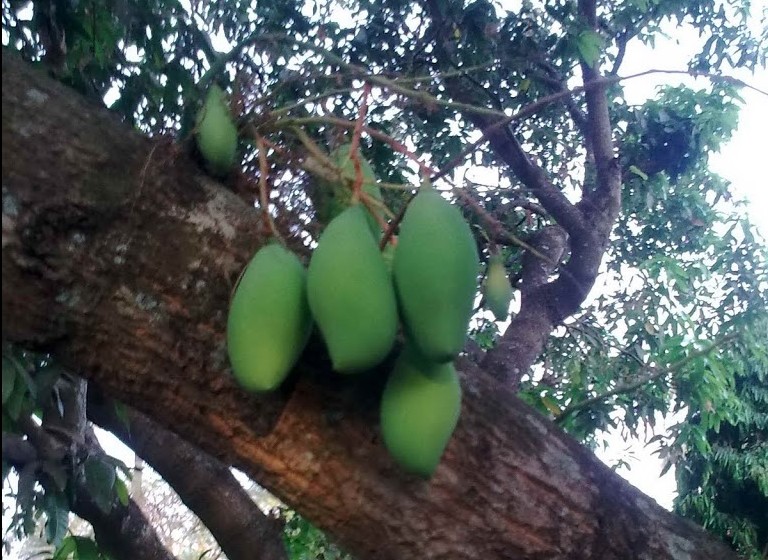
I just got back from my travels to India. I was fortunate to be there during the mango season. I had the privilege of eating green mangoes straight from my mother’s organic garden. My mother had planted two three-year-old mango saplings when I was about the same age.
Now the mango trees are big and spreading, full of luscious bright fruits. Its changing foliage, mass of budding feathery blossoms and hanging fruits present a spectacular view. The cool trees are an abode for tropical parrots and parakeets. The full-grown mature tree produces 400-600 mangoes at a time. Green mangoes start to appear in early April on Indian subcontinent. Some branches were so heavy with fruits that they almost touched the ground. Every time I went shopping I would cut a green mango into slices and take it in ziplock bag, my valuable vitamin C in the sweltering tropical heat. There was something gratifying about cutting down a stalk of green mango and chopping the fruit into small pieces. During leisure I would dip the pieces in a mound of salt and enjoy.
In India the green mangoes are not only used in pickles but utilized like a vegetable as well. It is really white inside, appearing more like daikon, jicama, or green papaya than mango. Its juicy tart flavor is a natural bonus to an imaginative cook. India is the abode to hundreds of varieties of magnificent marvelous mangoes. There is a surprising selection of just green pickling mangoes that vary in tartness, shape and size—literally from, 1-inch to 12-inches in length.
The mango tree is very much a part of Indian customs. It has an honored place in cultural and religious observances. Its slender pointed leaves, the branches and blossoms are used for various purposes. The leaves are skillfully arranged to decorate the thresholds and doors during feasts and in marriage banquets. The farmers have a special place for the mango tree since it signifies richness. A special spot is reserved for the mango tree in the field, it provides shade and a place to relax. Some dip the flat mango pit in ghee (clarified butter) and honey before planting the seed so it grows into a healthy tree. The young growing plant is then anointed with milk so there is a harvest of sweet fruits.
The green mango is not only nutritious but is cultivated since ancient times for various medicinal properties found in the leaves and bark of the tree. The raw mango is a vital flavoring part and cooked like a vegetable in curries, stews and salads. It is used in making chutneys, pickles, preserves and sherbets. Sliced and sun-dried, it is ground into fine powder to make the mango powder. Both the dried slices and powder are used as souring agent in curries, meat dishes, soups, and in preparation of tangy spice blends.
Buy an actual ‘green’ mango in the following recipe. The fruit it is quiet hard and nearly impossible to puncture with a fingernail, available in Indian, specialty and some supermarkets. Usually they are placed separate from the ripe ones and labeled ‘green mango’. Your grocer can probably find a very green mango from his stock, if you ask.
Warm Garbanzo Beans and Green Mango Salad
Here, I have paired the green mango with bland garbanzo beans and contrasting sweet coconut. The result is—warm, inviting salad with a wonderful hint of tangy taste. Try this vegetarian spring salad for light lunch or as an appetizer for dinner. If you have leftover cooked chicken or lamb in your refrigerator, by all means use in this salad.
I make this salad so many times and forget to take a photo of the dish, I will take the picture next time and share it. In the meantime, enjoy the easy salad.
- 1 medium green mango, unpeeled
- 1 tablespoon vegetable oil
- ½ teaspoon brown or yellow mustard seeds
- 2 dried red chiles, such as cayennes or chiles de arbol, stemmed, and broken into rough pieces
- 2 cups cooked garbanzo beans (freshly cooked or canned, drained)
- 2 tablespoons grated fresh or defrosted frozen coconut
- ½ teaspoon salt
- 1 small avocado
Wash and wipe the mango thoroughly. Peel the mango with a vegetable peeler. Using a hand grater (the fine holes of a hand grater result in a fine, fluffy texture) grate the mango, about half inch on all sides, then grate remaining fruit carefully, avoiding the large flat pit. Measure 1 cup and set aside.
Heat the oil in a medium skillet over medium-high heat. Add the mustard seeds; immediately cover with a spatter screen, and cook until the seeds stop popping, about 30 seconds. Toss in the chiles. Cook few seconds until crisp and lightly browned in spots. Add the mango, garbanzo beans, coconut and salt. Cook, stirring occasionally, until heated through, 5 to 6 minutes.
Mound the salad in the center of a decorative deep dish. Peel, pit, and dice avocado, and sprinkle over top of the salad and serve right away. Serves 4 to 6 as an accompaniment